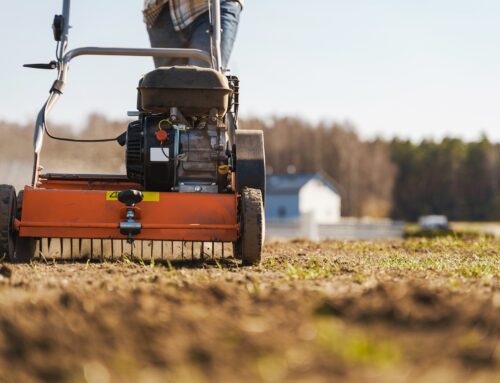
1. Start with a Spring Lawn Clean-Up
Before you can start planting, fertilizing, or dreaming about a lush green lawn, it’s important to roll up your sleeves and give your yard a proper spring clean-up. Winter leaves behind more than just cold weather—it can bury your lawn under a layer of leaves, twigs, salt residue, and other debris that smother the grass and block it from waking up properly.
🌿 Why Clean-Up Matters
Think of your lawn like a living, breathing organism. After being dormant for months, it needs sunlight, oxygen, and a little breathing room to kickstart growth. A messy lawn acts like a barrier, preventing those essential elements from reaching the soil and the grass roots. Debris can also hold moisture, which creates the perfect environment for mold, fungus, and pests to take hold.
Cleaning up early sets the stage for every other spring lawn care task you’ll do—and the sooner you start, the better your lawn will respond.
🧹 What to Remove
Take a walk around your property and look for:
Fallen branches and twigs from winter storms
Dead leaves that may have matted down over time
Leftover thatch (a layer of dead grass and roots)
Pet waste and other organic debris
Trash or salt buildup near sidewalks and driveways
Use a leaf rake to gently lift up the matted areas without pulling up healthy grass. A leaf blower can also help for larger lawns or tight spaces around landscaping features. If the soil is still wet or soggy, wait a few days to avoid compacting it underfoot.
✨ Pro Tip: Don’t Skip the Rake
Even if your lawn looks mostly clear, a light raking helps lift matted blades of grass and lets air flow more freely through the turf. It also helps remove thatch build-up, which can block water and nutrients from reaching the roots. Avoid using a heavy dethatching rake at this point—early spring is the time for gentle wake-up calls, not aggressive grooming.
🛠️ Tools You’ll Need:
Leaf rake or fan rake
Gloves and yard waste bags
Pruners (for cutting back perennials or overgrown edges)
Lawn waste bin or compost area
A clean lawn is the foundation of healthy growth. Once your yard is clear of debris, you’ll be ready to assess its condition and move on to the next steps in your spring lawn care plan—like aeration, weed control, and repairing any winter damage.
2. Inspect for Winter Damage
Once your lawn is cleared of debris and you can finally see what you’re working with, it’s time to take a closer look at the condition of your turf. Winter can be surprisingly harsh on grass—especially in regions that deal with snow, ice, and freezing temperatures. Performing a visual inspection early in the season helps you identify any problem areas and determine what your lawn needs most moving forward.
❄️ What Kind of Damage Should You Look For?
Here are the most common types of winter-related damage that can affect your lawn:
1. Bare or Thin Patches
Snow cover, foot traffic, pet activity, or salt runoff from driveways can leave parts of your lawn thin or completely bare. These areas won’t fill in on their own and may need overseeding or new sod to bounce back.
2. Snow Mold
If you notice gray or pinkish patches of matted grass, particularly in shady or damp areas, you could be dealing with snow mold—a fungal disease caused by prolonged snow cover and excess moisture. It can prevent grass from growing properly and may need to be raked out or treated.
3. Soil Compaction
If your lawn feels hard underfoot or water is pooling instead of soaking in, the soil might be compacted. This often happens in areas where snow was piled or people walked across the lawn during winter. Compacted soil restricts root growth and airflow, which can stunt your grass long-term.
4. Salt or De-Icer Damage
Lawns bordering sidewalks and driveways are often exposed to road salt or de-icing products, which can dehydrate grass and cause yellow or brown streaks. In these areas, the soil may need to be flushed with water or amended before replanting.
🧠 Why This Step Is So Important
Assessing your lawn early allows you to act quickly—before weeds take advantage of bare patches, or before compacted areas lead to deeper problems. It also helps you prioritize which spring lawn care treatments to focus on: aeration, overseeding, fertilizing, or even installing new sod.
It’s like a health checkup for your yard—get the diagnosis early so you can start the right treatment.
🛠️ What to Bring With You:
A notepad or phone to take photos/notes
A small trowel or screwdriver to check soil compaction
A rake to gently lift matted grass for a closer look
Flags or markers to highlight areas that need repair
Once you’ve taken stock of the damage, you’ll have a clear plan for what your lawn needs next—whether it’s a bit of TLC, a deeper intervention like aeration, or even a fresh start with new sod. Every great spring lawn care routine begins with knowing exactly what you’re working with.
3. Rake and Dethatch for a Healthier Lawn
Now that you’ve cleaned up the surface and assessed the damage, it’s time to help your lawn breathe again—literally. Raking and dethatching are often overlooked steps in spring lawn care, but they play a huge role in creating the conditions your grass needs to thrive.
Even if you raked in the fall, a good early-spring rake is essential for loosening matted grass, removing leftover debris, and preparing your lawn for new growth.
🌾 What Is Thatch and Why Should You Remove It?
Thatch is a dense layer of organic material—like dead grass, roots, and stems—that builds up between the green grass blades and the soil surface. A little bit of thatch (under ½ inch) is normal and even healthy. But when thatch builds up too thick, it creates a barrier that prevents water, air, and nutrients from reaching the soil and grass roots.
Too much thatch can also:
Encourage disease and pests
Hold excess moisture
Make your lawn feel spongy
Inhibit strong root development
That’s why dethatching is a critical part of your spring lawn care routine, especially if your lawn is older or hasn’t been maintained regularly.
🧹 Start with a Light Spring Rake
Begin by giving your lawn a good, gentle rake using a leaf or fan rake. This helps:
Loosen matted grass from winter
Break up light thatch buildup
Stimulate new growth by increasing airflow
Remove leftover leaves and debris missed during your initial cleanup
Pro tip: rake in different directions to avoid damaging the grass crowns (the part where new blades grow from).
🔧 When to Dethatch (and How)
If you notice a thick layer of thatch—more than half an inch—you may need to go a step further and dethatch the lawn. There are a few ways to do this:
Manual dethatching rake: Has sharp blades that pull up thatch. Great for small lawns but labor-intensive.
Power rake (dethatcher): A motorized tool that removes large areas of thatch quickly. Ideal for medium to large lawns.
Professional dethatching: If the job feels too big, many lawn care companies (like us!) can handle it for you.
Dethatching can be hard on your lawn, so timing matters. Early to mid-spring is ideal, once the ground is thawed and the grass has started to green up—but before you apply fertilizer or seed.
🛠️ Tools You’ll Need:
Leaf rake or fan rake
Dethatching rake or power rake (if needed)
Lawn bag or bin for removed thatch
Gloves and sturdy footwear
By raking and dethatching as part of your spring lawn care checklist, you’re removing barriers to growth and giving your grass the freedom to breathe, stretch, and soak in all the good stuff—sunlight, water, and nutrients. It’s a simple step that sets the stage for thicker, healthier turf all season long.
4. Aerate Your Lawn (If Needed)
One of the most powerful—but often forgotten—ways to revive your lawn after winter is aeration. While it might not be necessary for every yard every spring, aerating compacted soil can dramatically improve your lawn’s health by getting oxygen, water, and nutrients right where they need to go: the roots.
If your lawn felt spongy or hard during your earlier inspection, or if water is pooling instead of soaking in, it’s time to consider adding this to your spring lawn care plan.
🌱 What Is Lawn Aeration?
Aeration involves creating small holes in your lawn to break up compacted soil and allow essential elements—air, water, and nutrients—to penetrate more deeply. This encourages stronger root development, which leads to a thicker, greener, and more drought-resistant lawn.
There are two main types:
Core Aeration: The gold standard. Removes small plugs of soil, leaving them on the surface to break down naturally.
Spike Aeration: Uses solid spikes to punch holes in the soil. Easier, but less effective for severe compaction.
🧪 How to Know If Your Lawn Needs Aeration
You likely need to aerate if:
Your soil feels hard or dense
Grass looks thin, patchy, or slow to green up
Water runs off instead of soaking in
You notice a thick layer of thatch (½ inch or more)
Your lawn gets a lot of foot traffic or was under snow piles for long periods
To test for compaction, push a screwdriver or garden trowel into the soil. If it’s difficult to get in, the soil may be compacted.
🕐 When Is the Best Time to Aerate?
For cool-season grasses (like Kentucky bluegrass or fescue), early to mid-spring is a good time to aerate—just as the grass is coming out of dormancy and before the growing season is in full swing.
If you’re planning to overseed or fertilize, aeration should come first. It opens the soil and makes those treatments far more effective.
🔧 DIY vs. Hiring a Pro
You can rent a core aerator from a garden center or tool rental store, but be warned—they’re heavy and a bit awkward to handle. For small lawns, a manual aerator works (though it’s time-consuming). For larger or high-traffic lawns, you might want to consider calling in a professional lawn care service.
Bonus: if you’re already hiring Sod Crew to install sod or handle repairs, ask us about aeration—we’re happy to help prep your lawn for long-term success.
🛠️ Tools You’ll Need (Depending on Method):
Core aerator (manual or motorized)
Garden hose (for lightly watering the day before)
Lawn flags or markers to avoid sprinkler heads
Lawn roller (optional if plugs cause uneven surface)
Aerating your lawn might not be glamorous, but it’s a game-changer. By working it into your spring lawn care routine—especially if your lawn suffered compaction over winter—you’re laying the groundwork for strong, resilient turf that will thrive all season long.
5. Test and Improve Soil Health
If your lawn is the “face” of your yard, then the soil beneath it is the foundation—and healthy soil is one of the most important (and most overlooked) elements of effective spring lawn care. You can rake, aerate, and water all you want, but if your soil is too acidic, nutrient-poor, or compacted, your lawn won’t reach its full potential.
That’s why early spring is the perfect time to test your soil and give it a little boost where needed.
🔬 Why Soil Testing Matters
Soil testing tells you exactly what your lawn is working with. Is it too acidic? Lacking phosphorus? Overloaded with nitrogen from last year’s fertilizer? Without testing, you’re just guessing—and you could be wasting time (and money) applying treatments your lawn doesn’t even need.
When you know your soil’s pH and nutrient profile, you can fine-tune your spring lawn care strategy to get better, faster results.
🧪 How to Test Your Soil
There are two simple ways to test your lawn’s soil:
1. Home Soil Test Kits
Available at garden centers or online, these kits let you test pH and basic nutrient levels (nitrogen, phosphorus, and potassium) using color-coded strips or capsules. They’re quick and affordable, though not as detailed as lab results.
2. Lab Testing
For the most accurate results, send a soil sample to your local agricultural extension office or a certified soil lab. You’ll receive a full report on pH, macro- and micronutrients, and recommendations for what to add.
Tip: Take samples from a few spots around your lawn and mix them together for a more accurate average reading.
🌡️ Understanding pH and Nutrients
Ideal soil pH for lawns: Between 6.0 and 7.0
Too acidic? Apply lime to raise the pH.
Too alkaline? Add elemental sulfur to lower it.
Low in nutrients? Use a balanced fertilizer, compost, or organic amendments.
Correcting soil issues now gives your grass the perfect growing conditions before the growing season kicks into high gear.
🌱 Natural Ways to Boost Soil Health
Not a fan of synthetic treatments? No problem. Here are a few organic soil improvement options that align with eco-friendly spring lawn care:
Compost: Adds nutrients and improves soil structure
Worm castings: Excellent for boosting microbial activity
Topdressing: Apply a thin layer of compost over your lawn to improve soil quality over time
Mulched grass clippings: Leave them on the lawn after mowing to return nitrogen to the soil
🛠️ What You’ll Need:
Soil test kit or lab submission form
Small spade or soil probe
Clean bucket for mixing samples
Compost, lime, or soil amendments (based on test results)
Healthy soil equals healthy grass. By testing and improving your soil now, you’re not just fixing short-term problems—you’re investing in your lawn’s long-term resilience. Think of it as feeding your lawn from the inside out—because great spring lawn care starts from the ground up.
6. Fix Bare Spots with Seed or Sod
Even with the best lawn care habits, bare spots happen. Snow piles, heavy foot traffic, pet damage, and poor drainage can all leave patches of your lawn looking thin, brown, or completely bald by the time spring rolls around. But don’t worry—this is the perfect opportunity to fill in those gaps and give your lawn a full, healthy look for the season ahead.
Choosing the right repair method—seeding or sodding—depends on the size of the damaged area, your timeline, and your budget. Both can be part of a smart spring lawn care strategy.
🌱 Option 1: Overseeding Small or Thin Areas
If your lawn just looks a bit patchy or uneven, overseeding is a great option. This involves spreading grass seed over the existing lawn to fill in the gaps and encourage denser turf growth.
✅ When to Overseed:
Patches are small and scattered
You’re not in a hurry for instant results
Your lawn is already established but just needs thickening
🧑🌾 Tips for Successful Overseeding:
Rake or aerate beforehand to expose soil
Choose a seed blend that matches your existing grass type
Lightly topdress with compost or soil to help with seed-to-soil contact
Keep the area consistently moist until seedlings are established
Overseeding is cost-effective and great for long-term lawn health, especially when paired with aeration and proper watering.
🌿 Option 2: Patch with Fresh Sod
For larger bare areas, or if you want an instant green fix, sod is your best friend. Sod delivers immediate curb appeal and begins rooting into your soil within a couple of weeks with the right care.
✅ When to Use Sod:
Bare spots are larger than a dinner plate
You want quick, professional-looking results
Your lawn suffered major winter damage or disease
🧑🔧 Tips for Spot-Sodding:
Remove any dead grass and loosen the soil underneath
Cut sod pieces to fit the area snugly
Press down firmly and water immediately
Keep the area moist for 2–3 weeks to help the sod establish
If your lawn has extensive damage or patchiness throughout, this might even be the time to consider a full resodding—especially if you’ve been battling weeds or thin turf for years.
💡 Not Sure Which Option is Right?
If you’re stuck between seeding and sodding, consider the time factor. Seed takes several weeks to sprout and fill in, while sod gives you a lawn that looks complete almost immediately. Both can be used in combination—seed for thin patches, sod for bigger problem areas.
And if you’re looking for professional results with less guesswork, Sod Crew can help! Our team offers expert sod installation services that make lawn repair fast, easy, and stress-free.
🛠️ What You’ll Need:
Grass seed or sod rolls
Garden rake and topsoil
Compost or peat moss (for seed)
Lawn roller (optional for sod)
Hose or sprinkler for consistent watering
Bare spots are more than just cosmetic—they’re opportunities for weeds to take over and for lawn health to decline. By repairing them early in the season, you’re giving your lawn the strength and fullness it needs to thrive. Whether you choose seed or sod, this is one of the most rewarding steps in your spring lawn care routine.


